Results 1 to 9 of 9

Thread: Fun with Articulation! A pairadocs tutorial...

  1. #1
    Inactive Member pairadocs's Avatar
    Join Date
    January 15th, 2004
    Posts
    2,781
    Follows
    0
    Following
    0
    Mentioned
    0 Post(s)
    Tagged
    0 Thread(s)
    Quoted
    0 Post(s)

    Exclamation

    Ok, thought I'd do a little mini tutorial for those interested. Added a new feature to the Dreadlock Project today... thought I'd share.

    pairadocs's Guide to Adding Articulated Shoulder Pads (can be applied wherever else your creativity takes you...)

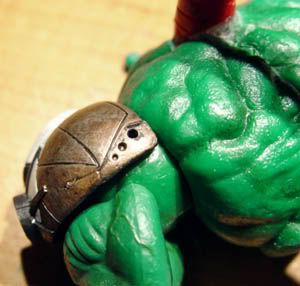
    Step 1 - I lined up the shoulder pads where I wanted them on the figure. I made sure they did no interfere with the movement of the arm. It does limit the ability to raise the arm a little, but not anything major enough to distract from posability. I then used a 1/8" bit to drill holes in the shoulder pads where I wanted the pegs to go.

    shoulder step1

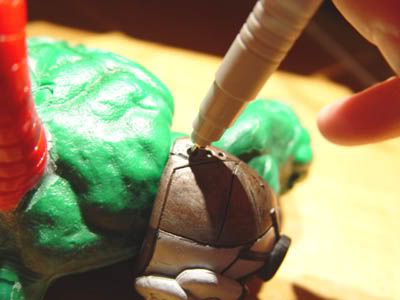
    Step 2 - Using a permanent marker pen, I outlined the shoulder pads holes on the part of the arm to mark where to drill on the shoulder so that they lined up. I did this on both sides of the shoulder.

    shoulder step2

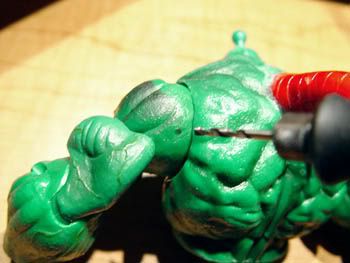
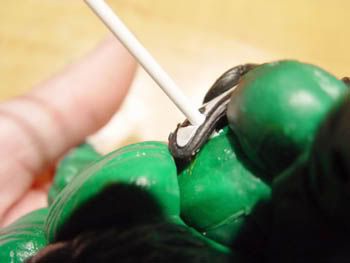
    Step 3 - Now that I had my marks, I used the 1/8" bit to drill small holes in the bicep. I only drilled in about another 1/8 of an inch.

    shoulder step3

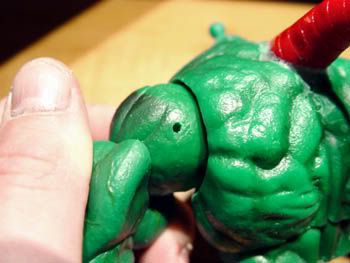
    Step 4 - We gots us some holes in the bicep!

    shoulder step4

    (to be continued)

  2. #2
    Inactive Member pairadocs's Avatar
    Join Date
    January 15th, 2004
    Posts
    2,781
    Follows
    0
    Following
    0
    Mentioned
    0 Post(s)
    Tagged
    0 Thread(s)
    Quoted
    0 Post(s)

    Post

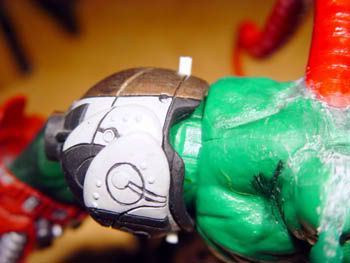
    Step 5 - I put the shoulder pads back on the figure, and using some 1/8" PVC rods (you can buy this pvc plastic stock at any hobby shop), I inserted it through the shoulder pads into the drilled holes in the bicep.

    shoulder step5

    Step 6 - This process is repeated on the other side. I insert a long pice in each side first, then when I snip off the excess, I make sure I leave extra on the end. This helps in removing it for primer and paint, and when final assembly is finished, I will trim themand glue them into place ONLY on the pads, to allow for movement of the pads when the arms move.

    shoulder step6

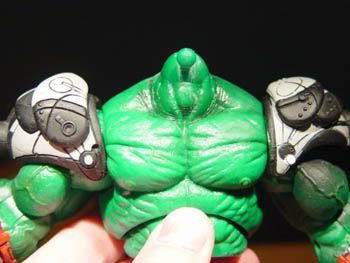
    step 7 - This is done on both shoulders. Voila! Movable shoulder pads!

    shoulder step7

    <font color="#cd6600" size="1">[ September 04, 2004 06:03 PM: Message edited by: pairadocs ]</font>

  3. #3
    Inactive Member pairadocs's Avatar
    Join Date
    January 15th, 2004
    Posts
    2,781
    Follows
    0
    Following
    0
    Mentioned
    0 Post(s)
    Tagged
    0 Thread(s)
    Quoted
    0 Post(s)

    Post

    Adding a balljoint

    Ok, I don't have all the steps documented, but here's a basic rundown of how I got the gloves on.

    Using a balljoint from a bionicle, I drilled a hole in the forearm of the figure, and put the stem of the ball inside. I superglued it, then using a soldering iron, melted scrap plastic around it to "weld" the plastic together. This is an amazingly tough seam now... they are literally fused together. <font color="red">WARNING: The fumes of melting plastic are really really bad, and will kill many brain cells and is very bad for you to inhale. Do this ONLY in a well-ventilated area.</font> I will later sand this down and/or smooth it with epoxy putty to "pretty it up" a bit.
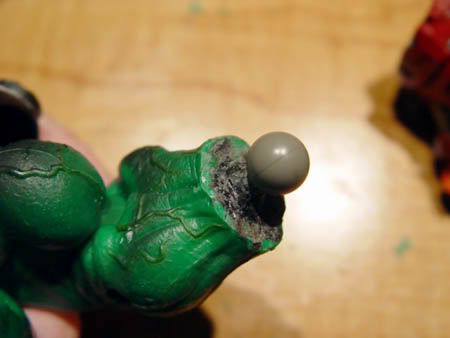
    arm2

    In the glove, I dremelled out a big hole. I then fastened the balljoint recepticle in the same fashion, but using more 2-part epoxy glue than plastic welding. I then glued in some plastic circles near the top that were left over from some CDR spindles where the forearm meets the glove, so the glove only spins in a 180 degree motion, with no wobbling. I will also later fill the rest of the area in with putty to ensure a snug, clean and pretty fit.
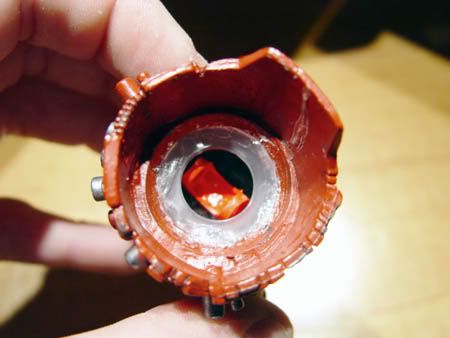
    arm1

    And there we go! A nice tight fit, and a good snug balljoint.
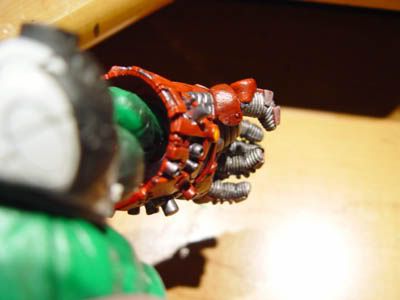
    arm3

  4. #4
    Inactive Member DARTH POOH's Avatar
    Join Date
    January 15th, 2004
    Posts
    3,327
    Follows
    0
    Following
    0
    Mentioned
    0 Post(s)
    Tagged
    0 Thread(s)
    Quoted
    0 Post(s)

    Thanks for taking the time to do this! You just tought an old customizer a new trick [img]biggrin.gif[/img]

  5. #5
    Inactive Member toymank's Avatar
    Join Date
    January 29th, 2004
    Posts
    6,855
    Follows
    0
    Following
    0
    Mentioned
    0 Post(s)
    Tagged
    0 Thread(s)
    Quoted
    0 Post(s)

    Post

    I love watching in progress stuff! [img]biggrin.gif[/img]

    and those shoulder pads'll look sweet on Dreadlock!


    Im actually using sort of the msame method for melting plastic on some projects now, but, Im not so well ventimilated! [img]wink.gif[/img] [img]eek.gif[/img]

    do some more tutorials! ....NOW! [img]tongue.gif[/img]

  6. #6
    Inactive Member Peter Peeker's Avatar
    Join Date
    June 17th, 2004
    Posts
    16,859
    Follows
    0
    Following
    0
    Mentioned
    0 Post(s)
    Tagged
    0 Thread(s)
    Quoted
    0 Post(s)

    Post

    sounds pretty easy, which means it won't be. [img]wink.gif[/img]

    may have to give it a try. [img]graemlins/thumbs_up.gif[/img]

  7. #7
    Inactive Member toymank's Avatar
    Join Date
    January 29th, 2004
    Posts
    6,855
    Follows
    0
    Following
    0
    Mentioned
    0 Post(s)
    Tagged
    0 Thread(s)
    Quoted
    0 Post(s)
    ...yeah I think it's fair to say that anything pairadocs does is above humanly possible! [img]wink.gif[/img]

  8. #8
    Inactive Member sculpey's Avatar
    Join Date
    November 22nd, 2001
    Posts
    8,165
    Follows
    0
    Following
    0
    Mentioned
    0 Post(s)
    Tagged
    0 Thread(s)
    Quoted
    0 Post(s)

    Wow ! Thanks for those tips. That was a great tutorial. You should write a book on this stuff.

  9. #9
    Inactive Member pairadocs's Avatar
    Join Date
    January 15th, 2004
    Posts
    2,781
    Follows
    0
    Following
    0
    Mentioned
    0 Post(s)
    Tagged
    0 Thread(s)
    Quoted
    0 Post(s)

    Post

    Thanks guys... it's really simple actually!

    I hope to be writing tutorial articles for the custom dungeon soon... I've been talking to Red Dragon about it, and it looks like it could happen!

    If not, I'll always be happy to do it for y'all!

Posting Permissions

  • You may not post new threads
  • You may not post replies
  • You may not post attachments
  • You may not edit your posts
  •